Showing posts with label technique. Show all posts

Friday, October 16, 2009

Roasting a Pepper


Roasted peppers are expensive to buy. And the quality is generally mediocre. Why spend money on something mediocre, when you can easily do it better at home?

All you need to roast a pepper are:
A Pepper
Fire or Heat
Tongs
A Brown Bag
Oil

You have two options for roasting: oven & open flame.

Fire


Clearly, it's much more fun to roast something over an open fire, so let's start there. Turn your gas burner on high (sorry, electric range users, no fun for you- go to the back yard and build a campfire...). Grip the stem of the pepper with the tongs, and place over heat. Rotate when the sides begin to blacken. You're going to need some courage here- there will be smoke and burning. Enjoy it.

When all sides are blackened, place pepper in a brown paper bag. Roll the top. Let the pepper cool in the bag for 15 minutes. This will allow the pepper to cook through, and the steam will help separate the skin from the flesh. To fully remove the skin, rub the sides of the bag. The friction will expose most of the flesh- use your fingers to do the rest.

Heat


A less fun, if more elegant, method for roasting a pepper is to use your oven. Brush the pepper with vegetable oil, and place on a baking sheet. (To avoid messy cleanups, you might want to line the sheet with aluminum foil.) Put that in a 400 degree oven. Every 10 minutes, use your tongs to turn the pepper. After about 45 minutes, you'll have a wonderfully roasted pepper.

No need to for the brown bag here, as the pepper will be more evenly cooked. Simply allow the pepper to cool, and then peel off the skin.

After that, remove the stem and seeds- they will be very easy to get rid of. Serve warm or cold. Or mixed into something else. However you want to. They're very good.

Wednesday, February 25, 2009

Seasoned Salt


I felt a little bad not sharing all my chili secrets, so I'm going to let you in on one of my secret seasoning salts.

1 Tbs. Kosher Salt
1 Tsp. Sugar
1/4 Tsp. Ground Coriander
1/4 Tsp. Garlic Powder
1/4 Tsp. Chili Powder
1/4 Tsp. Ground Sage -or- Poultry Seasoning
1/8 Tsp. Ground Celery Seed
1/8 Tsp. Onion Powder

This salt is a nice blend of sweet and spicy.  Great on chicken and grilled NY strip steaks.

Monday, November 17, 2008

Technique: How to Render Duck Fat


Let's begin by talking about the giant elephant in the room. Cooking with duck fat is not for everyday cooking. Duck fat is not healthy, at least in the unclogged artery sense of the word. It is, however, amazingly flavorful, and nice to have on hand to add something special from time to time. Also, if you're going to cook duck, might as well keep the fat!

If you're roasting duck, you can add trimmed fat/skin to the bottom of the roasting pan, and cover that with water. Excess fat will drain from the duck, adding to the mix. Make sure that the fat remains covered with water. When duck is finished cooking, strain the fat/water mixture into a smaller pot.

*If you're not roasting duck, and just happen to have trimmed fat/skin from previous duck cooking in the freezer, place directly into a small pot, and cover with water.


Bring to a boil, then reduce heat to simmer. Allow water to cook out. This will take about 45 minutes. The mixture will gradually become more golden as the water evaporates. It will bubble, slowly at first, then increasing. Once the bubbles bubble at a steady quick pace, remove from heat. Strain through a fine sieve, and store in an airtight jar.

Duck fat will keep in the fridge for at least a year. Sweet! You'll know it's turned bad when it smells...bad. Before that happens, it's going to smell like heaven.

Monday, August 11, 2008

Technique: Grilling Corn


Sweet corn is one of the joys of summertime.  As we enter August, corn is in high season.  The tasty, giant stalks of grass are plump with sweet kernels.  My favorite was to enjoy corn this time of year is to grill it.  Screw wrapping it in foil, I've a better way.

First step is to peel the husk back, all the way to the bottom, but not off.  Remove the silks, and a layer of the outermost husk.  Dispose of the silk, but save the husk.  Tear the husk into a few long, thin strips.  Rub corn with butter and salt.  Return the husk to first position, and secure it by tying with the strips.

Submerge the corn in cold water for 30 minutes to an hour.  Pat dry and place over hot coals.  The husk will begin to brown, while the corn steams in it's on deliciousness, aided by butter.  After ten minutes, remove corn and tear off the husk.  Careful, it's hot!

Apply more butter (if desired) and return to grill.  As the kernels brown, turn the corn.  Remove, adding salt/spices to taste.  

Summer!

Monday, August 4, 2008

Technique: Freezing Bacon


When you read my blog, you probably think all is great in my kitchen. Pretty true, but I have a problem, a big problem. I have too much bacon. You see, I'm a fella who lives alone. Sure, sometimes I'll cook a big meal that involves a fair amount of bacon, but, the reality is, I usually have more bacon than I know what to do with. More than four slices of bacon per serving is gluttonous. Bacon every day isn't very good for you. But leaving extra bacon to go bad in the fridge isn't very good for you, either. Have a problem, find a solution. My solution: freeze the bacon.

I don't know why I'd never thought of this before. So much bacon gone to waste or waist. Poor tasty pigs. Poor gluttonous belly, overstuffed with bacon. Well, that's not a problem anymore. This simple solution will allow you to have bacon on hand whenever you need it. Whether you just need a slice to enhance a dish, or if you're going for a full breakfast, just open your fridge!

Here's what you do:


1: Set aside two to four slices of bacon. You'll see why soon.

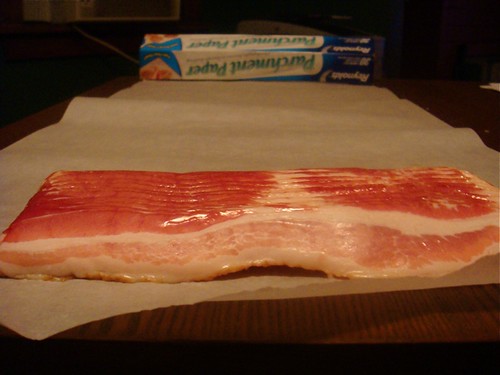
2: Lay out a sheet of parchment paper.

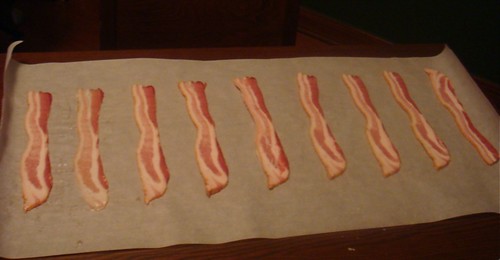
3: Place bacon on paper, leaving a slice-sized space in between each one.

4: Roll parchment over each slice, stacking on top of each other.

5: Wrap parchment roll in heavy foil. This will prevent freezer burn.

6: Place the wrap in a plastic freezer bag. This will keep nasty smells away from tasty bacon!

7: Place in freezer. The roll will keep for three months, but I doubt it will last that long. Use as needed.

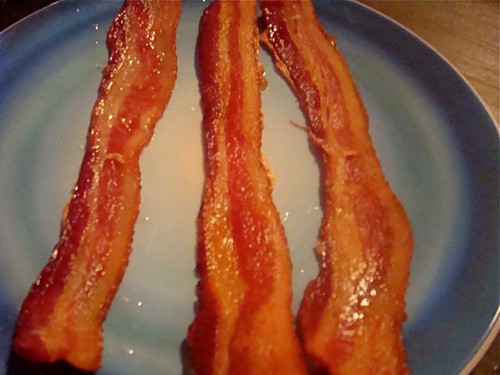
8: Cook the bacon you set aside and eat it. You can't work with bacon without enjoying some!


Monday, July 21, 2008

Technique: Safety First


The kitchen can sometimes become a dangerous place. Here are a few tips to make your life easier:

1: A sharp knife is your friend. The majority of knife accidents come from having a dull blade. You might think this sounds a bit funny, but when you think about it, it makes sense. A sharp knife will slice right through food, whereas a dull knife might slip from the surface and down toward your hand. Ouch!

2: A sharp knife is not your friend when trying to separate objects. This is the exception to the sharp knife rule. Say you're trying to separate frozen items. It it unwise to poke and prod at them with a sharp knife. This will most likely result in stabbing yourself, and a possible trip to the ER. Instead, use a butter knife to gently try to pry the pieces apart. Or, use physics! Smash them, or let them defrost a little bit for easier separation.

3: Make round objects flat. If you're slicing something round, like an apple, cut the bottom into a flat section. This will make it more stable, thus less likely to slip.

4: Metal conducts heat. It's true! If you put a pan into the oven, it's going to get very hot. So use a pot holder. This sounds really obvious, but, believe me, burns happen more than you think. If you do get burned, leave your hand under slightly less than room temperature water for 10 minutes. If it starts to blister, to the ER with you!

5: Oil and water do not mix.  The same reaction that makes fried food delicious also makes frying food dangerous.  Avoid putting wet pieces of food into oil.  The result could be disastrous.  Oil splattering all over the place will not only make a mess of your kitchen, it could also make a mess of your skin.  Not acne, friends, but burns.  Painful little burns.

Use common sense.  Think before you act.  Your mom wasn't lying when she told you to do that.

Monday, July 14, 2008

Technique: Simple Syrup


Well, since Friday's post was such a long one, I'll go simple today.  Real simple.

Simple syrup is as easy as it gets.  Combine a part sugar and slightly more than an equal part water.  Put over heat.  Stir until sugar dissolves. 

Simple!

See, sugar doesn't melt into cold beverages.  Ever dump a pack of sugar into iced tea at the local diner?  Stir, stir, stir.  The sugar still sits there, swirling around.  With simple syrup around, you don't have that problem.  Pour it into your iced tea, cocktail, broccoli juice, and it's sweetened.  It keeps just about forever, so make a pitcher and keep it in the back of the fridge.


Monday, June 30, 2008

Technique: Peeling a Tomato


It's tomato season. The vines are heavy with ripe red (yellow, orange, black...) fruit. The question often asked at this time of year is: 'How do I peel the damn thing?'


It's a pretty simple process, really. Bring a pot of water to boil. Submerge tomatoes for about 45 seconds. Immediately transfer tomatoes to an ice water filled bowl. This is done to stop the tomatoes from cooking. After a minute remove tomatoes from ice bath. The skin will now have separated from the meat of the tomato, making it easy to peel. Hooray!


Monday, June 23, 2008

Technique: Breading


Breaded treats make the world a delightful place. How does one do such a thing? Well, grab a beer and let your friend Hal B. explain.

Breading is using a liquid of some sort to make a bread-like product stick to whatever it is you're breading. What that liquid is, and what you use to bread it are up to you.

The classic technique goes something like this: dust item in flour, submerge in egg wash (one beaten egg plus a few tablespoons of water), and roll in bread crumbs. This works well, but creates a breading too thick for my taste. Plus, that's three dishes to clean!

A slightly thinner breading can be achieved this way: combine flour and milk at a three to one ratio in favor of the milk. Add two pinches of salt, and a pinch of sugar. Submerge your chosen item into mix, then roll in breading. My two favorites are corn flake crumbs and panko. Panko, for the those who don't know, is a coarse Japanese breadcrumb. It's wicked good. The picture at the top was breaded in this method, then deep fried.

The easiest way to bread something is to simply wet with water, then roll in flour or cornstarch. This will produce a very light coat. The drawback to this is that the breading is pretty unstable- it's the most likely to fall off, and the least likely to produce a tasty crunch. Still, it's nice for light dishes- speaking of dishes, this method uses the least, great for cleanup!

If you want to try something a little different, use beer as your liquid. It's good stuff.


Monday, June 16, 2008

Technique: Deep Frying


When I tell people I have a personal deep fryer, I am often met with shock. 'Really, Hal B., why would you want to deep fry something. It's so unhealthy...'

Now, I'm not going to claim that a deep fried delight is healthier than a piece of steamed tofu. However, fried right, it's not nearly as bad for you as you might think. It's also damn tasty.


Let's begin with the oil. Vegetable and canola (soybean) oil are your best bets. They are liquid at room temperature (thus liquid in your body), and have no saturated fats. Be aware that canola oil comes from large monoculture soy farms. Since you're able to reuse the oil for a long time, your environmental footprint still won't be too large, at least. Sadly, you should avoid lard, tallow, and other heavily saturated oils. They taste swell, but should be reserved for an occasional treat due to their general unhealthfulness.

Let's talk about grease and timing. When one complains that their fried food is 'greasy,' it's often a result of over-frying. Here's the deal: deep frying is a battle between oil and water. The oil is trying it's best to get inside what you're cooking. This is prevented by water vapor from the inside trying to escape. The result is the crispy, delicious meeting point that we all know and love. Things go wrong when all the water vapor escapes. Then...oil saturation. Greasy food. Bad bad bad things. To prevent this, use your eyes and ears. A killer golden brown crust is a sign that the battle is over. Even more importantly, you'll be able to hear it. The popping 'fry' sound is a sign things are going well. The reaction is happening. When that sound slows, oil is going to make your food greasy. Remove it, now.


Finally, let's talk temperature. You want to fry somewhere between 325 and 375 degrees. The temperature will depend on the thickness of what you're cooking. The thinner the food, the higher the temperature. Fry any lower, and the water inside won't have time to heat up. Remember, when you add food, the temperature of the oil will lower, so give it time to heat back up between batches.

If you don't own a deep fryer, you can still fry. Use a deep pot. Never fill more than 1/3 of the way. The last thing you want is a grease fire in your kitchen! (If this happens, cover it quickly in flour. Water will make it burn stronger.) Use a kitchen thermometer to judge the temperature, and adjust the heat as needed.

If you do this right, you'll have crispy treats with no greasyness. Check the oil level before and after- you'll see it's just about the same!

We'll talk about breading in another post.

Monday, June 9, 2008

Technique: Cutting Vegetables, Part One


"There's a lady I know
If I didn't know her
She'd be the lady I didn't know.

And my lady, she went downtown
She bought some broccoli
She brought it home.

She's chopping broccoli
Chopping broccoli
Chopping broccoli
Chopping broccoli

She's chopping broccoli
She's chop.. ooh!
She's chopping broccola-ah-ie!"
-Dana Carvey

This post is more about terminology than actual knife technique.  I slice and chop well, but there are better resources for that sort of thing.  My purpose is to let you have an idea of what people are talking about when they say 'dice' or 'julianne'.  

Here's something important before you begin: make sure your knife is SHARP.  Nothing cuts a fella faster than a dull knife.  Ironic, I know!

Julianne

Julianne is a fancy-pants word for slicing into small sticks.  Matchsticks.  Now you know.  This is part of the larger category of slicing.  You'll often see "cut into 1 inch slices," and the like.  It means pretty much what it means.  Don't get your ruler, just use your eyes.  No one will be measuring when they eat.  

Dicing

Dicing is, basically, cutting into uniform squares.  You dice when you're looking for smaller chunks than a slice, with more surface area.  Dicing is great when you have a few different kinds of veggies and you want them all to cook at around the same pace.  Again, no need to be exact- but do try to be in on the same playing field.

Chopping

Chopping is fun.  Nothing to worry about.  In fact, it's a great stress reliever.  Take your knife and chop away.  You chop to blend things into other things.  Want garlic in a sauce, but don't want chunks- chop away!  Be advised- when you chop you release more of the flavor, so make sure to taste as you add.

"At a 45 Degree Angle"

Why cut at a 45 degree angle?  Well, to maximize surface space.  More bang for the buck, greater area for browning, it looks pretty.  You can see from the photo above that you get a lot more carrot by cutting at an angle.  No protractor needed, just tilt your knife to what you think is about 45 degrees.  Good times.

Take your time and practice.  You're not going to be perfect straightaway, but who cares.  As long as you're in the general area, you're all good.  Leave perfection for those snotty French chefs, eh?!

Monday, June 2, 2008

Technique: Makin' Bacon


This blog was inspired by my good friend Karen, over at Off the (Meat) Hook. Karen writes a really excellent blog about all things carnivorous. Check it out if you have a minute.

Bacon. Bacon. Bacon. Possibly the most delicious of all meat. Salty, fatty, smoky. Pure goodness. Yet messy, and, for many people, hard to cook right. Here's a good technique from your friend Hal B.

Wrap a cookie sheet in foil. Strictly speaking, you don't have to do this, but it will save you a whole lot of cleaning up! If you have parchment paper, you can add a layer of that over the foil for more even cooking, but, no worries if you don't. After that, place a single layer of bacon. Cover the bottom of another pan with foil, place over the bacon, and weigh that pan down with bricks, rocks, bobble-heads, whatever. I know it seems like a bit of work- trust me, it's going to end up saving you a lot of time in the clean-up. Plus, the bacon will rock.

Put the whole hullabaloo into a 350 degree oven. Cook for 8 minutes, rotate, cook for another 8 minutes. Remove the bacon, pat down with paper towel, sit down, eat bacon. You can strain the rendered fat and use it for lots of tasty things, like cooking eggs to go with your bacon. Do it!

Note: Cooking time will depend on the thickness and quality of your bacon. I'd recommend a thicker cut, and try to avoid the over-processed Oscar Meyer type bacon. If it's undercooked after the cooking time, just take the top sheet off and cook another minute or two.

Monday, May 26, 2008

Technique: Thickening


A sauce is no good if it's running all over your plate and onto your table. What's a fella to do? You gotta thicken, thicken, thicken. Below are my four most useful thickening techniques.

Corn Starch
A corn starch slurry is my favorite way to thicken sauces. It provides reliable thickening power, and you can easily measure how much it will thicken. But what is a slurry, and why would I want to make it? Well, a slurry is a mixture of corn starch and water. You want to make it because if you put corn starch directly into hot liquid it would turn into a giant lump of cooked nasty. So, instead, you mix one part corn starch into about four parts water. Don't worry too much about exact measurements, just make sure all the starch is dissolved. Simply pour the slurry into the sauce, bring to a boil, and it will thicken!

Wondra
Wondra is a fine flour powder, and you can find it in the baking isle of any grocery store. Unlike regular flour, which both lumps and requires cooking, Wondra can go straight from the can into the sauce. It's the easiest way to thicken, and does a pretty good job, especially if you have just a little bit of sauce. Wondra claims it won't make lumps, but that's not entirely true. Put in only a little at a time, and whisk it in quickly. You'll be lump free that way.

Butter
Butter doesn't thicken much. It is, however, butter, so whatever you're making is naturally going to taste better! Perfect for adding a velvety texture and creamy flavor. A fine way to finish anything served over pasta.

Roux
A roux is a combination of equal parts butter and flour. It is the most labor-intensive and flavorful way to thicken a sauce. Combine butter & flour, then whisk continuously over medium heat. The flour must be cooked in order to avoid a raw flavor. The earliest stage of doneness is when the roux reaches a blonde color, and it can be cooked all the way to a deep brick red, nearly black. As it cooks flavor increases and thickening power decreases. I only make roux on special occasions, or when I'm making a dish that just isn't the same thickened in another way, such as my mac 'n cheese.

Monday, May 19, 2008

Technique: Browning


Happy birthday, dad!


People often ask me what the biggest difference is between home cooked food and restaurant food. In my opinion, when it comes to meat, the biggest difference is browning. Browning, or, more technically, the Maillard reaction, occurs as heat caramelizes the natural sugars in the meat.

Browning brings out the amazing flavor of meat. It adds depth to slow cooked dishes, and highlights taste in quick cooked ones. To achieve best results, browning requires three elements: heat, salt, and courage.

Heat
Constant heat needs to be applied. There is a picture in people's minds of a chef madly moving a sauté pan back and forth, tossing a piece of beef around. Clear your minds. What you want to do is apply constant, hot heat. The less you move what you're cooking, the better.

Salt
Salt helps to create a crust on the surface of the meat. Additionally, as it is salt, it adds flavor. Using a coarse grained sea or kosher salt will work better than traditional table salt.

Courage
You're going to be doing less, while leaving the heat on more. This might test your patience. The temptation will be to check check check every few seconds. Bad idea, buddy. Just let the Maillard reaction do it's magic. Also, there is going to be smoke. People will shout at you. They will tell you you're burning dinner. Just smile and open a window. Later, when they are praising your skills, smile again and close the window.

You'll know success when both sides are a rich golden brown color.