Showing posts with label favorite. Show all posts

Thursday, February 25, 2010

Smothered Pork Chops


Had a few friends over for a great soul food dinner the other night. The highlight? Well, all of it. But the smothered pork chops I made were the centerpiece.

Add, to a medium hot pan:
2 Onions, thinly sliced

Cook for 8 minutes, stirring frequently.
Onions should be translucent, not brown. If you hear a loud sizzle, reduce heat slightly.

Add:
4 Cloves Garlic, smashed
2 Teaspoons Salt

Cook an additional 3 minutes.
Remove from pan.

Turn heat to high, and then brown:
1.5 Pound Pork Chops

Remove pork chops from pan.
Deglaze pan with:
1 Bottle Good Beer
     *I used Newcastle. 


Add:
1 Cup  Chicken Stock
1/2 Can Cola
2 Tablespoons Apricot Jam
1 Tablespoon Apple Cider Vinegar
2 Teaspoons Dried Thyme
2 Teaspoons Mustard
Small Handful Juniper Berries (optional)

Return pork chops, onions, and garlic to the pan.

Cover pan.
Reduce heat to low.
Let simmer 2 hours, turning occasionally.

Add:
5 Springs Fresh Marjoram
5 Springs Fresh Thyme
2 Teaspoons Worcestershire Sauce

Thicken sauce.
Impress your friends.

Wednesday, December 31, 2008

Dedication


What would you do on a super-cold, snowy day? Set up a stand in the local farmers' market? That's what quite a few vendors did today in the Union Square Greenmarket in Manhattan. With the wind blowing, snow falling, and most of the city (except for the schmucks waiting in Times Square...seriously, I have no idea why people think that's fun...) taking naps, local food purveyors still lined the market.

Sure, it was a bit more sparse than a bright summer's day. But you could still find everything you need for an amazing meal. Two grass fed beef vendors, sustainable poultry & pork, apples aplenty, root veggies, squash, preserves, wine...


The point is, if these guys and gals can drag their asses into Manhattan & stand in the cold/snow, we can all make a little effort to eat locally. It's a lot easier than what they're doing. So let's do that.

I'm going to have a Ronnybrook Farm yogurt, and a mackintosh apple (75 cents a pound, take that megamart!), and get ready to get hammered. Happy New Year.

Wednesday, November 26, 2008

The Apple, specifically the Arkansas Black


If, for some wacky reason, you're still buying peaches/nectarines/grapes, stop. The season is over my friends, even here in California. Time to spend some time with your old friend, the apple.

Yes, we can get apples year round. And, unlike most other fruits that have been shipped long distances, they're pretty good all year. Apples, when cooled properly, store really well, and that's a very good thing. But, do we really need to have them shipped from far far away? We don't. And, thankfully, we don't have to. Apples grow throughout the country, and, with a quick stop at the farmers' market, you might find something interesting.

In my case, it was the Arkansas Black, an heirloom variety dating back to the 1870s. What a great find! It's texture is super crisp, the flavor mostly sweet with just the right balance of tartness. It's perfect out of hand, tasty chopped & added to a salad.

You might not be able to find this variety, but, I bet you'll find something you haven't tried. Yup, I'm a fan of the Fuji apple, but it was nice to try something different!

Here's a quick tip: Notice how the top of the apple is all brown? I thought maybe this was a sign of not-so-goodness, but, it turns out, it's just the opposite. That's the pollen mark. The bigger the mark, the sweeter the apple. Who knew?! Great tip, and very true. That apple in the above pic was sweet indeed.

Monday, November 24, 2008

Making Yogurt


A few days ago Karen updated her facebook status to something like "Thinking about making yogurt from scratch. Wondering if I'm becoming a hippie." Well, I'd argue that anyone that titles their blog "Off the (Meat) Hook" probably is in no danger of becoming a hippie. I think she's safe. More interestingly, we agreed to both conduct yogurt making experiments.

So I experimented. The result was not a terrible failure, as I had first thought, but, I wouldn't call it a grand success either. What happened was:


I started with whole raw milk. Since the first step was to heat the milk to 180F, I felt it would be an interesting and wholesome choice to go with unpasteurized milk. If you're at all freaked out by this, use the pasteurized stuff, by all means. I've never tried raw milk before, and you can taste the difference. It tastes somewhat fresher and cleaner, if that makes sense.

Why heat the milk to 180? Well, you want to kill off any unwanted bacteria, so you can introduce your own desired bacteria. This is best done over a double boiler, to prevent scorching, but I used a regular pan and that worked just fine. Heat to 180, once it reaches that, remove and cool.


Now comes the tricky part. Really tricky. And, not terribly fun. You need to monitor the milk as it cools. Yeah. Annoying. The goal, a temperature between 108 - 112 degrees. Why? Well, that's the temperature that the good yogurt making bacteria does best.

So, when you get there, which will take tedious time, stir in two tablespoons of organic plain yogurt. I know, why not just eat that yogurt instead?! Well, maybe you should. But for the sake of the experiment, stir it in. This introduces yogurt cultures to the milk, starting the process of fermentation. If you decide you love making yogurt, you can save a small part of each batch to use as a starter for the next one.


Now comes the tricky part. Really tricky. And, not terribly fun. Wait, did I just say that? I did. Like I said, this is a tedious experiment. Now, you have to keep the fermenting pre-yogurt at the same 108 - 112 degrees for 4-6 hours. Fun!!!!!

I took my warm milkgurt and put it in the oven. Luckily, I have an old timey 1950s gas oven. The pilot flame keeps the inside of the oven at about...110 degrees! Lucky me. So, I just left it there, stirring and taking the temp from time to time. After 4 hours, nothing. After 6, it smelt and tasted a little sour (good) but the consistency remained about the same (bad). So, I went out for a beer.

Two hours later, not much had changed. The whatever it was now became a bit thicker, but not very yogurt-like. I figured what would be done was done, so I removed it from the oven and put it in the fridge.

The next day, things looked better. A decent sized pool of watery whey had formed on the top. I poured this off, stirred the mix, and, found I had indeed made something that kind of resembled yogurt. It was a little more sour than the commercial yogurt. I added a fair amount of honey and agave, and it was pretty good. Grainier texture than I would have wanted, but pretty good.

Was this worth it? Probably not. The flavor, once sweetened a bit, was slightly better than commercial yogurt. The texture was not. This was a lot of tedious work. There are very good small batch yogurts for sale just about everywhere. I'm going to continue to buy those.

Maybe Karen will have better luck. She's much more science-minded than I am. (Her dad is some kind of world famous neuroscientist, and that clearly has rubbed off.) Also, she's a dirty hippie.

I should add that whatever it was I made was fine with my belly. So, although I didn't make perfect yogurt, I didn't make myself sick, either!

Monday, November 17, 2008

Technique: How to Render Duck Fat


Let's begin by talking about the giant elephant in the room. Cooking with duck fat is not for everyday cooking. Duck fat is not healthy, at least in the unclogged artery sense of the word. It is, however, amazingly flavorful, and nice to have on hand to add something special from time to time. Also, if you're going to cook duck, might as well keep the fat!

If you're roasting duck, you can add trimmed fat/skin to the bottom of the roasting pan, and cover that with water. Excess fat will drain from the duck, adding to the mix. Make sure that the fat remains covered with water. When duck is finished cooking, strain the fat/water mixture into a smaller pot.

*If you're not roasting duck, and just happen to have trimmed fat/skin from previous duck cooking in the freezer, place directly into a small pot, and cover with water.


Bring to a boil, then reduce heat to simmer. Allow water to cook out. This will take about 45 minutes. The mixture will gradually become more golden as the water evaporates. It will bubble, slowly at first, then increasing. Once the bubbles bubble at a steady quick pace, remove from heat. Strain through a fine sieve, and store in an airtight jar.

Duck fat will keep in the fridge for at least a year. Sweet! You'll know it's turned bad when it smells...bad. Before that happens, it's going to smell like heaven.

Monday, October 27, 2008

A Lasagna for Obama


While I was watching the final presidential debate, I suddenly felt inspired to do something. I am part of a group of people who grew up as the tail end of Generation X- not quite the slackers of the group before us, but certainly still feeling the pull of apathy about government. Something has changed in the last few months. People all over the country are engaged, desiring to pitch in and do something. So it was that I decided to throw a dinner party to raise money for Barack Obama and Joe Biden.


The party started off with a prosciutto and melon appetizer. This is a perfect example of a dish in which quality of ingredients means everything. I mean, everything- there are only two pieces to the dish! I was really happy with the cantaloupe I found; lucky guess, really- I don't know much about picking them out. I grabbed one that had a nice light yellow color throughout and smelt slightly of a musky perfume. The prosciutto was quite good, though I think I'm ruined for life after eating the heavenly home cured prosciutto at Downey's a few months ago. Some tastes never leave the soul of your belly.

The main event was a killer grass fed beef lasagna (for Obama). The beef was from J&J, one of my favorite local beef companies. Really excellent stuff. If you've never had grass fed beef before, you're in for a real treat. A smaller spinach lasagna, a Vice Presidential lasagna for Biden (he has a Popeyeish quality, don't ya think? I mean, you know the guy eats his spinich.), was also served. It was pretty damn tasty, especially for a first attempt. Mixed green salad, featuring peppers from my garden, was served on the side.


Tasty, fresh baked, apple pie (thanks Cass) and a homemade ice cream were served for dessert.

Overall, $265 was raised for the campaign. While quite a bit less than my friend Karen (who clearly has a future in fundraising should she choose to depart from a world of creative awesomeness), I was pretty stocked we beat my goal by $15. Also, the food was totally fantastic, and my friends and I had a kick ass time. U.S.A.! U.S.A.! U.S.A.! (Yeah, that's right, I'm taking that chant back from the crazy wingnut militia types. U.S.A.!)

Thursday, October 23, 2008

The Jujube: Not So Awesome


I've been exploring a variety of exotic fruits recently. Perhaps it's a reaction to the fact that I've been nearly everything I've eaten this year has been grown locally. Maybe not though- all of the exotic fruits I've tried so far have been procured from the farmers' market. So maybe it's the best of both worlds, exotic and local. I like that.

Well, unlike the passion fruit and the guava, the jujube is not awesome.

I thought maybe it would be. Last week, at the Culver City farmers' market, I noticed a few vendors had large piles of strange brown items. The looked like a cross between a chestnut and a date. Seemed worth trying, so I got a variety of them- some yellow turning brown, some deep brown and smooth, some deep brown and wrinkled.

The fruit is believed to have first been cultivated in Southern Asia, and is widely used in Chinese medicine as a treatment for stress. It is also believed to soothe sore throats.

Sadly, the flavor doesn't move me. Ripe when fully brown, and, I thought a little better when slightly wrinkled, it tastes of a dull apple. The texture is reminiscent of a sponge. With apple season upon us, you might want to skip these little brown bugaboos, and grab an heirloom apple instead.

Friday, August 15, 2008

Idea: Failure


I had an improv teacher who, whenever your scene went haywire, would have you exclaim, with utmost joy and enthusiasm, "I FAILED!". Sometimes, he'd have the whole class join in the celebration of failure. The point being, even if you fail there is something to gain.

I find this to be especially true when it comes to food. Cooking is about experimentation. You have a great idea, find a killer recipe, and you make it. Sadly, the flavors didn't come together as expected. It tastes like poop. We've all done it.

Once, when trying to impress a girl, I decided to make smoked pork chops. The brine tasted great. The smoke was wonderful. The chops had a deep mahogany color. When it came time to eat, they tasted like a salt lick and had the texture of plastic. Not so good. Unimpressed.

The picture above is corn, recently harvested from my garden. Corn, that is the size of a baseball. Ever seen corn the size of a baseball before? Probably not, because corn is meant to be a whole lot bigger. Your corn is also probably covered with rows of tasty kernels. My corn was not. Not at all. Well, I FAILED!

Life goes on. As it turns out, you have to grow a lot of corn for the ears to grow as they're meant to. Ten ears in an overturned shed is not enough. I put a lot of love into it, but it didn't work out. One day, I'll have my own field of dreams. For now, I'll take a third run on growing dragon carrots. Yup, failed twice on those, too! Maybe this time I'll get it right.

Everybody, all together now, with joy: I FAILED!

Monday, August 4, 2008

Technique: Freezing Bacon


When you read my blog, you probably think all is great in my kitchen. Pretty true, but I have a problem, a big problem. I have too much bacon. You see, I'm a fella who lives alone. Sure, sometimes I'll cook a big meal that involves a fair amount of bacon, but, the reality is, I usually have more bacon than I know what to do with. More than four slices of bacon per serving is gluttonous. Bacon every day isn't very good for you. But leaving extra bacon to go bad in the fridge isn't very good for you, either. Have a problem, find a solution. My solution: freeze the bacon.

I don't know why I'd never thought of this before. So much bacon gone to waste or waist. Poor tasty pigs. Poor gluttonous belly, overstuffed with bacon. Well, that's not a problem anymore. This simple solution will allow you to have bacon on hand whenever you need it. Whether you just need a slice to enhance a dish, or if you're going for a full breakfast, just open your fridge!

Here's what you do:


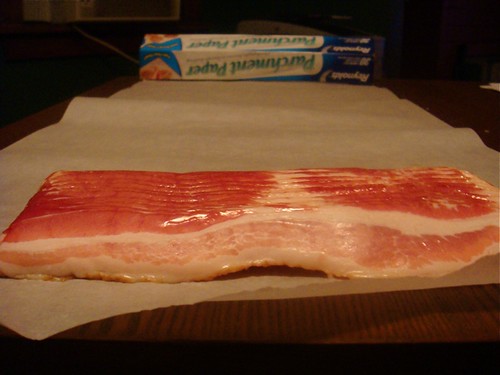
1: Set aside two to four slices of bacon. You'll see why soon.

2: Lay out a sheet of parchment paper.

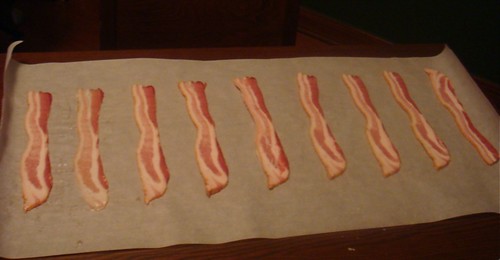
3: Place bacon on paper, leaving a slice-sized space in between each one.

4: Roll parchment over each slice, stacking on top of each other.

5: Wrap parchment roll in heavy foil. This will prevent freezer burn.

6: Place the wrap in a plastic freezer bag. This will keep nasty smells away from tasty bacon!

7: Place in freezer. The roll will keep for three months, but I doubt it will last that long. Use as needed.

8: Cook the bacon you set aside and eat it. You can't work with bacon without enjoying some!


Friday, August 1, 2008

Idea: Empty Your Spice Rack


You know you have it. Somewhere in your kitchen, taking up lots of space, is a stack of old-ass spice jars. Oregano that smells vaguely of mint, paprika that smells like sawdust, and a can on some sort of celebrity spice mix that sits nearly full. My solution, dump it.

Now, these herbs and spices are still technically 'good,' by which I mean they are safe to eat. Dried herbs don't go bad, they just wither away. You know the shirt you have, the one you love, the one your girlfriend desperately tries to make you throw out? That's the rosemary sitting at the back of the second shelf. Trust me, you might think it's good, but it isn't. Toss it. Now.

Dried herbs have a potent shelf life of about six months. After that, they begin their slow fade. By the one year mark, they are a shell of what they used to be. What's the point of using a shell? If you're working with high quality fresh ingredients, it makes no sense to season it with something past it's prime.

So here's what you do. Take everything out. That's probably a good idea regardless, because, if you're like me, you probably need to do a little dusting there anyway. Next, take any jars you know are old- the ones with faded labels and dust- and chuck them straightaway. If you have any herbs you know you bought recently, they can stay. As for the rest, use your senses. Does it look faded? Smell like what it's meant to smell like? Anything that seems old, let it go. It's OK. You'll get more.

Next time you go to the store, buy what you need in the smallest possible package, unless you know you use a lot of something. A lot of better grocers are starting to sell miniature sized supplies. This is good.

You'll feel better for doing this. The spice rack is an often overlooked section of the kitchen. Give it a little attention, and your belly will thank you for it.

Friday, July 25, 2008

Drink of the Day: Agwa de Bolivia

Move over Jagermeister, there is a new Sheriff of Crazy in town. Meet Agwa de Bolivia.


Agwa de Bolivia is a nitro fueled liquor containing extracts of Bolivian coca leaf, guarana, and ginseng. It's made in Amsterdam, which should tell you something. Frankly, I'm not quite sure how this stuff is legal!

Let's begin with the coca leaf. Yes indeed, cocaine is derived from said leaf. However, it is highly processed. Pure coca leaf has been a part of Andean mountain life for millennium. It's effects are much subtler than cocaine. It, along with the guarana, provide the energy boost that comes with Agwa, but you're not going to wake up the next morning with a bloody nose and a nasty addiction. Fear not.

Don't fear the nearly neon green color, either. Despite it's crazy look, the taste is rather pleasant. After the initial taste of mouthwash (really!), the flavor mellows into something both fruity and minty. In fact, Agwa has one of the most pleasant aftertastes I've experienced in booze. This is due to both the bright flavor profile, and the fact that it's only 60 proof.

Oh, but what a 60 proof it is. Let me say this: don't drink a lot of coffee if your planning on having a few drinks of this. Agwa de Bolivia will keep you up late. It's a perfect booze if you're planning on having a high energy night out. After two shots worth, I felt plenty energized, and just a little bit high. The effects are rather unique.

Agwa de Bolivia can easily enjoyed as a straight up shot. The Agwa website recommends squeezing a bit of lime into your mouth before the shot, saying it increases the potency of the booze. Perhaps it does. In the interest of science, you should try it. This stuff is very mixable, too. Personally, I really enjoyed it over ice with a bit of soda water. Experiment, mix it up, see how you like it best!

Friday, July 11, 2008

Idea: Read The Label


It's amazing what goes into processed food these days. This is especially true with so-called 'healthy options'. I'm talking fat-free versions of foods that should indeed contain fat, trendy 'diet' products that are really sugar and corn devices cleverly designed as limited calorie packs, and a food that we all know and love.

FAT FREE


You'll notice many ingredients in this fat free half & half that have nothing to do with milk or cream. Corn syrup is listed number two, meaning there is a significant amount in there. Dipotassium phosphate is an insecticide! Probably not something you'd want to put in your morning cup of joe. I really enjoy how artificial color is footnoted as 'an ingredient not normally found in Half and Half.' As if sodium citrate is! Cream is listed as adding a trivial amount of fat. Now, as cream is classified as having at least 18% fat, something seems amiss here!

In contrast, regular half & half has two ingredients, milk and cream. When you think about the limited quantity you would normally use, the extra fat seems a pretty good trade off when compared to corn syrup, preservatives, mystery 'cream,' and insecticides.

ONE HUNDRED CALORIE PACKS


One of the latest trends in processed food marketing is packets containing servings of a certain amount of calories. The purpose is to let us feel guilt free about snacking on shitty foods. The marketers want you to believe that if you follow their calorie recommendation, you'll be enjoying a great snack.

The problem is, you'll be eating many things that you probably shouldn't be eating. The top ingredient listed is sugar. Now, a little sugar isn't a terrible thing, but when it's the main ingredient of your 'healthy' snack, that's another story. They've also managed, as most manufacturers these days do, to sneak high fructose corn syrup into the snack pack. It seems unnecessary, considering there are already a ton of sugar and sugar substitutes listed, including glycerin. Have a look at wikipedia if you want to see what else glycerin is used for!

My favorite ingredient in this, however, is: Partially Hydrogenated Vegetable And/Or Animal Shortening (Soybean, Cottonseed And/Or Canola Oil, Beef Fat). Go ahead and read that again, your eyes weren't deceiving you. Yeah, there might or might not be beef fat in your 'healthy' cupcake snack! Now, I have no problem cooking with animal fats, though, to be fair, beef fat is probably at the bottom of my animal fat cooking list. The problem I have is that unless you're reading the label, you have no idea that beef fat is in there. It's certainly not healthy, not even healthy for the soul the way cooking eggs in bacon drippings is. It's just wrong. This isn't beautifully rendered beef dripping, used to make Yorkshire Pudding. This is the shit that's left over from processing factory farmed beef. Why waste it when you can make an extra few bucks by slipping it into cupcake batter, eh? I almost feel sad for vegetarians who unwittingly eat this.

BREAD


This one makes me angry. Very angry. Bread, the wholesome staple of our youth, has been horribly corrupted. A few years ago, it suddenly became very evil to eat any bread products. CARBS!! OH NO!! Yes, simple carbohydrates are mostly empty calories. Yes, eating them will not keep the hunger wolves at bay for very long. But, no, bread as a concept is not evil. What is evil is the shit that they sell as bread in today's grocery stores. Perhaps the problem isn't simple carbs alone. Perhaps the problem is what's in our loaf of 'bread'.

Ingredient number three on the above bread label is high fructose corn syrup. Why? Once again, the corn marketers have found a way to stuff us with crap. There is no place for this in our bread, my friends. Has our palate become so addicted to sugar that we need to add it to something that is sweet by nature?

We also find a list of additives that are, quite frankly, unpronounceable. I'm not a fan of eating things I can't say aloud without sounding like I rode the short bus. Monocalcium phosphate and ammonium sulfate are commonly used chemistry set componets of industrial fertilzers. Azodicarbonamide, a bleaching agent linked to asthma, is banned in Europe and Australia, and its use can result in 15 years inprisionment (!!!!!) in Singapore. Um, what?! That's in my bread?

Bread, as I am aware, is meant to be flour, water, salt, and yeast- with the possible addition of some kind of oil and maybe some kind of seed. My people even omit yeast sometimes!

DON'T BE FOOLED


The point of all this: beware the marketing man. Above is packaging on the bread that was previously described. The name, 'EarthGrains Cracked Wheat,' implies health and wholesomeness. Yet, there is more high fructose corn syrup than cracked wheat in the bread. 'One Hundred Calorie' packs imply that you're doing right by your diet. Yet, you're eating beef fat and explosives. 'Fat Free' Half & Half would make you think that you're limiting calories and rocking out your health. Yet, you're adding insecticieds to your moring coffee.

Read the labels. It might be scary, but you'll be glad that you did.

Friday, June 20, 2008

Idea: Don't Worry About Perfection


There are a lot of resources that will tell you how to perfectly cook an egg, or will show you the only way to roast a chicken. Well, I say balderdash.

Look, at the end of the day, eating good food is about what tastes good to you. Perhaps you've noticed my recipes specify things like 3-4 cloves of garlic. That's because there is no right answer. There's a ballpark you need to be in, but maybe you don't love garlic as much as I do. So put in less. It's alright.

The omelet pictured above was made at 2:30AM. I was hammered. I wanted eggs. I didn't think about setting the pan just right, adding the perfect amount of cream, lovingly flipping it over. I had some good cheese and leftover bacon, threw it in there, and scrambled it up. And, my oh my, it was great.

I write this because I feel that a lot of people are intimidated into thinking they can't cook because they don't have the perfect technique. Well don't stress it my friends, you can do it too. The more you cook, the more you'll learn what tastes right together for you.

There is an exception to this: do worry about perfection in the ingredients you use. Buy fruits in season. Get grass fed beef. If you do, the rest is easy.


Monday, June 2, 2008

Technique: Makin' Bacon


This blog was inspired by my good friend Karen, over at Off the (Meat) Hook. Karen writes a really excellent blog about all things carnivorous. Check it out if you have a minute.

Bacon. Bacon. Bacon. Possibly the most delicious of all meat. Salty, fatty, smoky. Pure goodness. Yet messy, and, for many people, hard to cook right. Here's a good technique from your friend Hal B.

Wrap a cookie sheet in foil. Strictly speaking, you don't have to do this, but it will save you a whole lot of cleaning up! If you have parchment paper, you can add a layer of that over the foil for more even cooking, but, no worries if you don't. After that, place a single layer of bacon. Cover the bottom of another pan with foil, place over the bacon, and weigh that pan down with bricks, rocks, bobble-heads, whatever. I know it seems like a bit of work- trust me, it's going to end up saving you a lot of time in the clean-up. Plus, the bacon will rock.

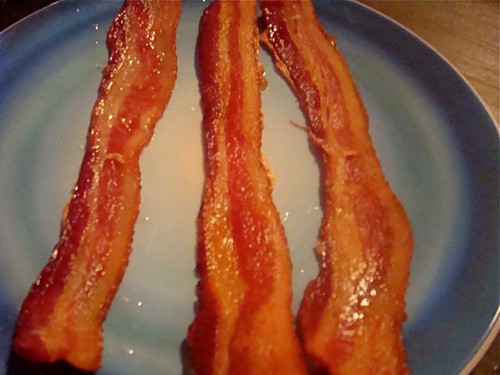
Put the whole hullabaloo into a 350 degree oven. Cook for 8 minutes, rotate, cook for another 8 minutes. Remove the bacon, pat down with paper towel, sit down, eat bacon. You can strain the rendered fat and use it for lots of tasty things, like cooking eggs to go with your bacon. Do it!

Note: Cooking time will depend on the thickness and quality of your bacon. I'd recommend a thicker cut, and try to avoid the over-processed Oscar Meyer type bacon. If it's undercooked after the cooking time, just take the top sheet off and cook another minute or two.

Monday, May 26, 2008

Technique: Thickening


A sauce is no good if it's running all over your plate and onto your table. What's a fella to do? You gotta thicken, thicken, thicken. Below are my four most useful thickening techniques.

Corn Starch
A corn starch slurry is my favorite way to thicken sauces. It provides reliable thickening power, and you can easily measure how much it will thicken. But what is a slurry, and why would I want to make it? Well, a slurry is a mixture of corn starch and water. You want to make it because if you put corn starch directly into hot liquid it would turn into a giant lump of cooked nasty. So, instead, you mix one part corn starch into about four parts water. Don't worry too much about exact measurements, just make sure all the starch is dissolved. Simply pour the slurry into the sauce, bring to a boil, and it will thicken!

Wondra
Wondra is a fine flour powder, and you can find it in the baking isle of any grocery store. Unlike regular flour, which both lumps and requires cooking, Wondra can go straight from the can into the sauce. It's the easiest way to thicken, and does a pretty good job, especially if you have just a little bit of sauce. Wondra claims it won't make lumps, but that's not entirely true. Put in only a little at a time, and whisk it in quickly. You'll be lump free that way.

Butter
Butter doesn't thicken much. It is, however, butter, so whatever you're making is naturally going to taste better! Perfect for adding a velvety texture and creamy flavor. A fine way to finish anything served over pasta.

Roux
A roux is a combination of equal parts butter and flour. It is the most labor-intensive and flavorful way to thicken a sauce. Combine butter & flour, then whisk continuously over medium heat. The flour must be cooked in order to avoid a raw flavor. The earliest stage of doneness is when the roux reaches a blonde color, and it can be cooked all the way to a deep brick red, nearly black. As it cooks flavor increases and thickening power decreases. I only make roux on special occasions, or when I'm making a dish that just isn't the same thickened in another way, such as my mac 'n cheese.

Monday, May 19, 2008

Technique: Browning


Happy birthday, dad!


People often ask me what the biggest difference is between home cooked food and restaurant food. In my opinion, when it comes to meat, the biggest difference is browning. Browning, or, more technically, the Maillard reaction, occurs as heat caramelizes the natural sugars in the meat.

Browning brings out the amazing flavor of meat. It adds depth to slow cooked dishes, and highlights taste in quick cooked ones. To achieve best results, browning requires three elements: heat, salt, and courage.

Heat
Constant heat needs to be applied. There is a picture in people's minds of a chef madly moving a sauté pan back and forth, tossing a piece of beef around. Clear your minds. What you want to do is apply constant, hot heat. The less you move what you're cooking, the better.

Salt
Salt helps to create a crust on the surface of the meat. Additionally, as it is salt, it adds flavor. Using a coarse grained sea or kosher salt will work better than traditional table salt.

Courage
You're going to be doing less, while leaving the heat on more. This might test your patience. The temptation will be to check check check every few seconds. Bad idea, buddy. Just let the Maillard reaction do it's magic. Also, there is going to be smoke. People will shout at you. They will tell you you're burning dinner. Just smile and open a window. Later, when they are praising your skills, smile again and close the window.

You'll know success when both sides are a rich golden brown color.


Friday, May 9, 2008

Penne Pesto with Chicken Breast


Two Chicken Breasts
1 4oz. Package Basil
1/4 Cup Parmigiano Reggiano Cheese
1/3 Cup Toasted Pine Nuts
3 Cloves Garlic
1/8 Cup Olive Oil
1 1/2 Cups Milk
Pasta, Two Handfuls per Person

This is a creamy preparation of pesto sauce, which, combined with roasted chicken, provides a killer meal for you and your friends. Although it takes a little bit of work, nearly everything can be done in advance! Thus...easy entertaining.

Start by roasting the chicken. Simply rub a little olive oil on the breasts (!), then season with salt/pepper/garlic powder. Throw it in a 425 degree oven, feel free to use your toaster oven even, for 7 minutes, flip, and cook another 7 minutes. Slice at a 45 degree angle (don't stress about perfection) when ready to use.


Now...pesto sauce! Really easy to make. People will think you're a genius. All you have to do is combine the basil, garlic, cheese (for the love of Pete, please DO NOT use the stuff in the green can- you can spring for the good stuff), milk, oil, and half the pine nuts. Take your handy hand blender, and whip it up. Done!


**If you don't have a hand blender, get one! They're great for all sorts of things, from frothy drinks to well, pesto sauce. Also, to toast the pine nuts, simply toss in a medium hot pan until they turn a golden brown.

To finish, simply cook pasta. I find two regular sized handfuls per person makes a good serving size. Drain pasta, add sliced chicken and pesto sauce. Toss, heat together, serve. Genius.

Wednesday, April 16, 2008

Brotherhood Steak


New York Strip Steak
Salt
Pepper
Olive Oil
Butter
Brother, or other friend (optional, but recommended)

My brother and I used teamwork the other night to make some kick-ass steaks. Generally, a great strip steak is something that happens only in a steak house. This one, however, came pretty damn close.

We started by rubbing the meat with a little bit of olive oil, then seasoning the steaks well with salt and pepper. Brother then cut generous slices of butter to put atop the steak, while I got the grill ready. I used hardwood lump charcoal, which I'd highly recommend over the cheaper commercial kind. It burns hotter, and has a better flavor.

After a few minutes on the grill, you might notice a whole lot of smoke. This is from the butter hitting the coals. Don't stress about it, just give it a few sprays from a water bottle. The butter/fire reaction will enhance the flavor of the steak. While you're doing that, have brother slice more butter.

After about 3.5 minutes, depending on thickness of your steak and how close it is to the fire, flip, and butter the flipped side. Remove from grill, allow to rest a few minutes, eat and be happy.

Friday, April 11, 2008

Pot Roast


4lb Top Round Roast
5 Carrots, quartered
5 Stalks Celery, quartered
1 Large Onion, quartered
2 Parsnips, quartered
1 Turnip, quartered
5 Cloves Garlic, smashed
2 Cups Red Wine
2 Cups Beef Broth
1 Cup Pureed Tomatoes
4 Carrots, quartered
1 lb. Boiling Potatoes, Yukon Gold if Possible


Begin by rinsing beef, and salting genrously. In a deep pan or dutch oven, brown all sides until deep color is achieved. This is important in both forming the braising liquid, and developing the flavor of the meat. There's not too much work for you to do after this, so take your time.


While the beef is browning, transfer the vegetables to a roasting pan. Toss with a little vegetable oil and salt, and roast in a 400F oven for 20 minutes, until veggies just begin to show color.

When beef is browned, deglaze pan with red wine, making sure to scrape brown bits off sides and bottom of pan. Add broth, tomatoes, roasted veggies (with pan juices), and beef. Cover, and simmer for 2.5 hours.


At this point you have two options. You can allow to cool, then refrigerate overnight. This will result in a deeper flavored sauce. Or, you can continue to the next step straightaway.

Remove beef from pan, and transfer to a cutting board. Strain braising liquids through a sieve, then return strained liquid to pan. Remove onions, puree spent veggies, mix with some of the beef, and serve to your dog. She will be happy.

Slice the beef, against the grain, into medium thick slices. Return to pan, along with 2nd batch of carrots. Simmer, and after an hour, add potatoes. Total second cook should be 2-3 hours, depending on your patience. Make sure potatoes are cooked through.

The Mac 'n Cheese


1 Box Macaroni
2.5 Cups Sharp Cheddar Cheese
1.5 Cup Gruyere Cheese
1 Cup Dubliner Cheese
1/2 cup Parmesan Cheese
2 Cups Milk
Flour
Panko
A Lot of Butter!

It may come as a shock, but mac 'n cheese is one of the most effort-intense dishes I make. Don't let that stop you, it's very good! Also, it doesn't take much time.

Begin by making a roux, using 4 tablespoons flour and 4 tablespoons butter. Whisk rapidly over medium heat until roux reaches a light blond stage, about 10 minutes. Add milk, a little bit at a time, whisking while going to break up lumps.

After milk is incorporated, add the cheese, again bit by bit. Whisk as you go, allowing the cheese to melt. When this is finished, you will have a lush cheese sauce.

At the same time, cook macaroni according to package instructions. In a large mixing bowl, mix the cheese sauce and cooked pasta. Butter the bottom and sides of a baking dish (I use a lasagna pan), and transfer the mix. Note: You could serve the mix as is, but this will be way better.

Mix more butter (!), melted, panko, and parmesan cheese, then layer on top of macaroni. Transfer to oven, broil until the top is golden brown and bubbly. Serve, and bask in the glory of your creation.

Sorry for the lack of pics- some didn't come out well, and the final product was served at a party. My camera was sitting on my desk at the time!